

The primary objective of the scenario is to sink the HMS Courageous. In real life Schuhart had stalked the converted carrier for over two hours, and when the British warship turned into the wind to launch aircraft it unwittingly placed itself across the bow of the German U-Boat, a perfect T firing solution for the attacking vessel. This is the position that the player controlled submarine in the game finds itself at the start – the Courageous some 5,000 meters off the starboard side of the U-29.

For this outing I am taking a 1939 VIIB U-Boat at 49%
realism (the default normal setting is 29% realism: I disable a few more things
to heighten the challenge).

This is probably the sixth or seventh time I have played
this scenario in an effort to win it for material to make a blog post about.
The cold hard truth is that although the player controlled U-Boat starts out in
an optimal firing position with ample time to configure the various parameters
of the torpedoes to attack the primary objective, this is 1939 and those
torpedoes are shit for the mission at hand. I immediately order ahead standard
not giving a crap if the screen detects me.

The T I (G7a) torpedo is a gas/steam fish that has great
range, but at 5,000 meters the British anti-submarine patrol has more than
enough time to see the visible wake from a distance and begin evasive
maneuvers, something that the Courageous modeled in the game is quite adept at.
Considering that there is a significant likelihood one or more torpedoes will
prematurely detonate (especially if set at a depth below 5 meters with a magnetic
pistol), firing any package from 5,000 meters is sheer stupidity.

My U-Boat is the black circle with the tail behind it and
the red line to the starboard side is the first enemy contact update from the
hydrophones. The two range rings I have drawn are 5,000 meters (the maximum
range for a fast speed on the G7a - sheet stupidity) and 1,000 meters (my
preferred kill zone in submarine warfare). Although this is extremely early war
and the British ASW capability is at its weakest, I still don’t want to flirt
with a destroyer escort screen when my objective is clear – the carrier.

While the game settings allow for a scaled difficulty with
many options (including realistic torpedo reload and ship sinking times which I
am using for this series of AAR), one thing that is not effectively modeled is
the time it takes to reconfigure a torpedoes depth and impact pistol settings.
At the outset the firing panel on the periscope array is already a full green
tree.

The sighting range is 5,000 + meters against a target that
has a draft of 8.3 meters, and thus begins my eternal struggle of selecting a
magnetic pistol to detonate under the keel and possibly break the back of the
beast in a single detonation or an impact pistol at a 3 meter draft that if
placed right at the sweet spot (the fuel stores) could cause an equally catastrophic
breakup. In either case this is the beginning of the war and as mentioned above
the fish are shit, so a visible wake will be on the surface anyway with a high
likelihood that some may never make it to the target vessel.

Initially I configure all four forward tubes on the VIIB to
a 3 meter depth and an impact pistol setting. Depending on the angle on the bow
and the potential evasive maneuvers of a target I have had several fish glance
off the side of a hull, but far too many more magnetic pistols prematurely explode
before reaching the target. This constant dance in the game is one of the
things that make it still fun to play after all these years.

This is just a glamour shot of the U-29 charging ahead at
periscope depth.

The Courageous battlegroup as it is interpreted in the game:
the converted carrier and four destroyers. The one on the starboard side
working its way to the right would prove to be significant as it would open the
door for me to move directly in on the carrier and split the ASW screen.

This is just a glamour shot of the HMS Courageous, steaming
unwittingly to its demise.

Crew management 101: stock up the bow torpedo and electric
engine rooms with the highest rated personnel to minimize delay as much as
possible.

With one destroyer off to the right looking for something I
have a free shot at the Courageous as I slip between the ASW screen. Here I
make a slight course adjustment to align the bow of the U-29 with my
anticipated firing orientation.

At the last minute I change up my firing package and go with
two independent salvo solutions: tubes one and four at a depth of 9 meters and
a magnetic pistol, configured with a 2 meter spread angle. At the range I have this
should put the carrier in a precarious position. Tubes two and three are
similarly set in case I need to bring them immediately to bear on the situation
at hand.
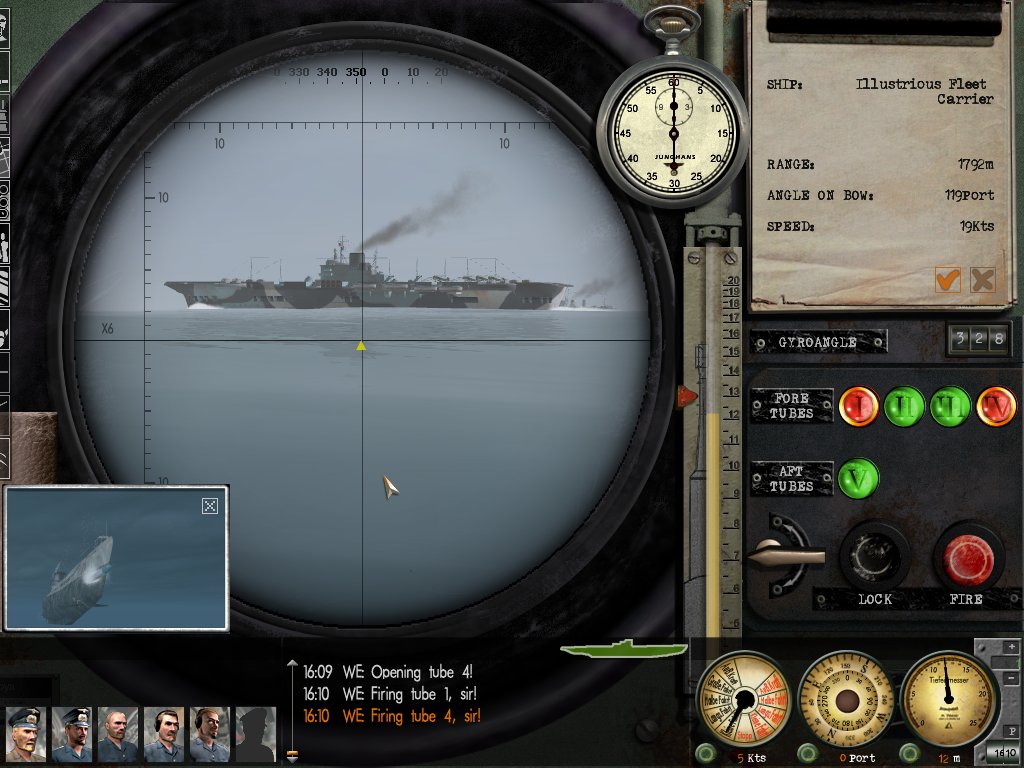
At less than 2,000 meters I flood the tubes and release the
salvo of torpedoes one and four at the British warship.

All fish are configured for the highest speed setting as the
visible wake they are producing on the surface will be noticed by the lookouts.

The Courageous spots them too late to effectively maneuver
out of the threat: the tube four fish (the left side wake) sails under the bow
of the ship while tube one (the right side wake) ends up directly under the
superstructure and smoke stack, putting the full force of the detonation on the
engine room and fuel stores.

I have hit this ship in several previous attempts causing
significant damage, but it was able to outrun me while I was forced deep by the
destroyer screen allowing it to get away. With the realistic ship sinking time
enabled, I didn’t feel like waiting around in those efforts to see if it died a
slow death.

This time although I did not cause immediate destruction to
the target vessel, such catastrophic damage nevertheless resulted that within a
minute of the explosion under the keel the British ship has taken a fatal pitch
forward that will seal its fate.

The forward part of the flight deck slips under the water as the destroyers race forward.

It is all in vain though as the screws come out of the water
and the carrier begins its plunge to the ocean floor.

Less than two minutes after the detonation of the second
torpedo the carrier is completely submerged. I can’t imagine what those poor
souls went through in real life when this happened.

In the logbook I receive credit for a 23,000 ton kill on an
Illustrious Fleet Carrier. In real life the captain of the U-29 received both
classes of the Iron Cross.
After-action Report

I think I have figured out the “U-Boat lost” message here –
although not a defined objective I believe I have to complete a scenario on the
surface, otherwise this message appears. Frankly I didn’t feel like exiting the
attack area and surface for that, so I ended the mission here with the primary
objective completed.
This mission was played on 7/19/15 on a Windows 7 machine.
No comments:
Post a Comment
Note: Only a member of this blog may post a comment.