

Each mission offers up an “Aftermath” dialogue at the beginning which details what would have happened in a real life event: in this case the “Third Battle of Norderfurt” devolved into a disjointed mess of poorly supported breakthroughs that resultedin a Pyrrhic victory for the Soviets.
Game Options

I am playing the scenario in full 30 minute (simulated) turns. There are a total of 28 turns however this mission will be done long before that.
Realism Options

NATO units are intended to use stealthy movement by default which enables them to utilize any available local cover and concealment to optimal advantage while moving. WARSAW Pact forces typically put a premium on high speed movement and overall formation cohesion so they would generally not utilize stealthy movement.
The Electronic Warfare Intensity Level slider is largely irrelevant as the scenario designer sets the degree to which jamming takes place: in this scenario the setting is high.
Order of Battle

There are a number of screens relating information regarding the scenario before the game begins, one of them being the OOB for the friendly forces. Here I have Task Force 2-67 (Armored), the 4-67th Armored Battalion, Task Force 5-18 (Armored), and 1st Battalion, 26th Fallschirmjäger (mechanized West German infantry).
There is also a flight of A-10 Thunderbolts as well as off map artillery support in the form of M109 A2/3 Howitzers and a nuclear capable Lance SSM launcher.
This is a highly generalized representation of the actual forces, and does not indicate which ones are later turn reinforcements.
Critical Units

The M1A1 Abrams is a first line Main Battle Tank that features a 120mm main gun and a unique combination of special characteristics that give it an edge over the Soviet MBT.
For this scenario I will have 78 M1A1 MBT’s as front line units at the start, with none scheduled as later turn reinforcements.

The M2A2 Bradley Infantry Fighting Vehicle is a first line IFV that features two TOW anti-tank missiles, 84mm and 66mm anti-tank rockets, as well as a 25mm autocannon.
For this scenario I will have a total of 58 M2A2 IFV’s as front line units.

The M109 A2/3 155mm Howitzer is a self-propelled medium artillery vehicle that features smoke, chemical, FASCAM, as well as the devastating 155mm round.
For this scenario I will have a total of 24 off map M109 howitzers.

The M901 Hammerhead is a self-propelled AT vehicle that features two TOW anti-tank missiles.
For this scenario I will have a total of 12 M901 vehicles as front line units.

The M752 Lance is a surface-to-surface nuclear missile that comes with a loss of 75 Victory Points per use.
For this scenario I will have one Lance SSM launch vehicle.
Pregame Setup Phase One

This is the pregame setup phase where I can take the default disposition of forces and drag and drop them where I like within the blue bounding box. The game map replicates an area of the western portion of the Federal Republic of Germany measuring 20 km X 15 km, while each grid square represents 500 meters.
Objectives

NATO has Victory Points available in Sector Six (50) only. The Warsaw Pact has Victory Points available in Sector Six (130) only. Considering that both sides will be fighting for control of the same objective sector with massive amounts of units, this stands to be one of the bloodiest battles of the war.
Although a nuclear capability is present in this scenario, its usage is costly: 75 Victory Points per nuclear strike, which (if utilized) would appear in the Starting Handicap section of the Accumulated Victory Points summary. To simply break even, I would have to destroy 75 Warsaw Pact vehicles (steps) which make the use of this feature quite a conundrum.
“Occupying a Quadrant” means having a preponderance of force as measured in unit steps in that quadrant. All that is required is that one side has even one step more than the other for it to be considered occupied. “Clearing a Quadrant” means reducing the number of enemy steps in that quadrant to below 10.
“Occupying a Quadrant” means having a preponderance of force as measured in unit steps in that quadrant. All that is required is that one side has even one step more than the other for it to be considered occupied. “Clearing a Quadrant” means reducing the number of enemy steps in that quadrant to below 10.
Pregame Setup Phase Two

This entire scenario seems to be nothing more than an expanded version of Meeting of Titans, since we are both fighting over control of the same Sector Six objective. In that effort I was able to achieve a Tactical NATO Victory outcome by using a reverse L formation to block the Soviet advance.
The blue bounding box for the pregame setup is very large, so there are a number of options available to me this scenario. Now that there are a lot more units to deal with, I intend to form a layered defense with the more expendable units up front (in the face of what I anticipate to be the axis of attack) so I can husband my more premiere forces such as the Abrams MBT's.
I anticipate that the enemy will approach from the southeast through the valley between the river and the wooded mountain. There are bridges at grids 18-20 and 12-25 that I need to take into consideration as well, for the enemy may send a probe that way which would effectively threaten the right flank of my deployment that I orientate facing southeast.
The various HQ units situated near their organic line units will scoot out of harm's way based on the established SOP Doctrine of not allowing an enemy to come within 3,000 meters.
The three batteries of eight M109 A2/3 Howitzers each are ordered to deploy FASCAM at several expected approach corridors.
And yes, I am sacrificing the West German mechanized infantry units from the very start of the scenario by placing them out front.
Combat Action

Turn 1 ends with the FASCAM deployed and some back and forth fire from the upfront infantry.
Losses: NATO (7) Warsaw Pact (0)
Additional orders: FASCAM deployment at the indicated grids.

Turn 2 ends with a Soviet incursion in the north mainly allowed due to my failure to mine the bridge at grid 29-6, however the mines laid at the bridges in the southeast corner of the map have proved quite effectively as several explosions were detected there. Given the proximity of what I feel is Warsaw Pact probes, several of my HQ units have begun to scoot to new locations due to the SOP Doctrine in place.
Losses: NATO (19) Warsaw Pact (56)
Additional orders: FASCAM deployment at the indicated grids.

Turn 3 ends with a disturbing picture
forming. The Soviets seem to be successfully whittling away at my layered
defense, and I watched in horror as a single Warsaw Pact tank unit destroyed
eight M1A1 Abrams MBT's near the forest.
Losses: NATO (58) Warsaw Pact (115)
Additional orders: fearing for the safety of
my main HQ unit, I order it to move to the heavy cover of an urban center. All
available artillery is brought to bear on the exposed enemy units at the edge of
the woods.

Turn 4 ends in a complete blood bath. I am
shocked at how many units simply disappeared from the battlefield during the
turn resolution. I lost a significant number of M1A1 Abrams MBT's to Soviet
tank units, and it seemed for some time that any shot that the enemy was taking
was collecting kills.
Losses: NATO (93) Warsaw Pact (191)
Additional orders: I have not yet detected
any air strikes from the enemy (Mi-24 Hind or Mig-23), so I commit what is
effectively my reserve armor to the objective sector in an attempt to squeeze
some usage out of those units before they are destroyed by any upcoming Soviet
air reinforcements.

Turn 5 ends and the overall outlook is not
encouraging. Although the Victory Point balance meter at the bottom of the task
bar is at 71% in my favor, this is not always indicative of how a scenario
would actually end. I witnessed several grid to grid engagements between NATO
and Warsaw Pact MBT's where the United States suffered what I perceive to be
somewhat unrealistic losses, with additional platoons simply vanishing from the
battlefield during the turn.
Losses: NATO (110) Warsaw Pact (228)
Additional orders: concerned that I cannot
continue this attrition battle, for the first time I am seriously considering a
tactical nuclear strike on the other side of the mountain, where I believe a
number of Soviet units may be staged. However I check this urge knowing that it
comes at the cost of 75 Victory Points, which I can ill afford to lose at the
moment.
I order one of the reconnaissance units to
move behind the mountain to give me a better picture of what I may be facing.

Turn 6 ends with the realization that the
Soviets are employing airstrikes that I had previously not detected.
Losses: NATO (136) Warsaw Pact (267)
Additional orders: at the end of the turn I
received notification of my own air reinforcements, in the form of helicopters
and ground attack aircraft. The helicopters consist of a single AH-1F Cobra and
a single OH58C Kiowa grouped together, which is ordered to patrol directly east
across the top of the map to scout for any enemy stragglers. The flight of A-10
Thunderbolts are ordered to attack an enemy unit at grid 24-17 (with a two grid
discretionary range), and the three M1A1 Abrams's units brought down earlier
are given an order to move closer to the forest.

During turn seven I would receive notice that one side has
exceeded 80% casualties among their line units, and given that the Victory
Point balance meter on the task bar is at 69% in my favor, I decide to accept
the offer (a risky proposition at such a low number).

The game ends in a Decisive NATO Victory outcome (I am shocked).
A player wins decisively if he nets 180 points or more over the enemy. 105 points or more is a tactical victory, 30 points or more is a marginal victory, and any other result is a draw.
After-action Reports
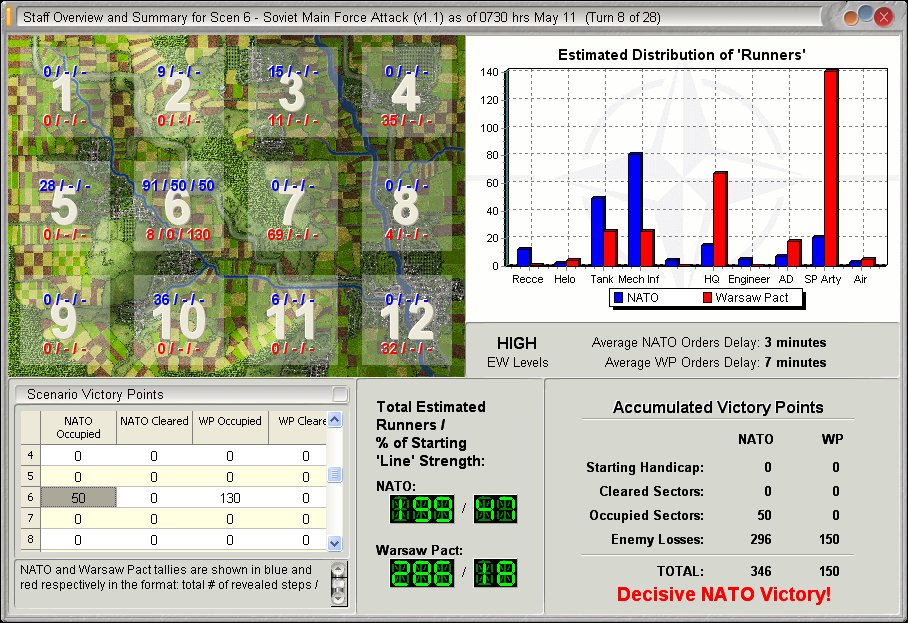
The Staff Overview and Summary reveals the final score as 346-150, a difference of 196 points. The unit loss during this scenario was breathtaking, with NATO losing 150 units and the Warsaw Pact losing 296.

The Tactical Operations Center Staff Diary details the number of survivors and the effectiveness of each unit.
The standout unit was 1st Platoon, A Company, 4-67th Armored Battalion (four M1A1 Abrams MBT's) that accounted for 21 total kill claims before being completely destroyed. Nine of those kills were Soviet MBT's, and nine other were APC's.
The standout group was D Company, 4-67th Armored Battalion (12 M1A1 Abrams MBT's) that accounted for 34 total kill claims before losing eight MBT's.
Review Final Situation

At the end of the game (brought about by losing 80% of their front line units), the Soviets managed to have only a single unit in the objective Sector Six, consisting of eight vehicles (steps) which were T-80U's and a single T-80UK.

Although I did detect several units passing the bridge (mined) in the northeast part of the map, they did not mount any serious threat to the left flank of my position.
The bridge in the southwest (also mined) was never probed. The Warsaw Pact AI commander effectively rested the hope of the entire assault on a two pronged strike through the forest running diagonally through the center of the map.
This was at first blunted by the various minefields deployed, and then outright repulsed by the MBT's that stood their ground under withering fire to repel the Soviet force.
This scenario was played on 8/30/15 on a Windows XP machine.
No comments:
Post a Comment
Note: Only a member of this blog may post a comment.